 One of the biggest differences between beginner beats and professional productions often comes down to one thing: drum impact.
You may have great melodies, strong chords, and solid arrangements—but if your drums feel thin, weak, or lifeless, the beat usually won’t hit the way you want.
That’s where drum layering comes in.
Drum layering is the process of combining multiple drum sounds to create a single, fuller, more powerful drum hit. Instead of relying on one kick, snare, clap, or hi-hat, producers stack multiple sounds together to achieve depth, punch, texture, and character.
From hip-hop and trap to R&B and pop, drum layering is one of the most important techniques in modern music production.
In this guide, you’ll learn how to layer drums properly, avoid common mistakes, and create professional-sounding beats that hit harder.
Introduction: Why Drum Layering Matters
Why Single Drum Sounds Often Feel Weak
Most raw drum samples only excel in one area.
A kick may have:
- Great sub bass
- Weak attack
A snare may have:
- Sharp transient
- Thin body
A clap may have:
- Great stereo width
- Little punch
Rarely does one sample do everything perfectly.
That’s why producers layer.
By combining multiple sounds, you build the ideal drum.
Why Professional Drums Sound Huge
Listen to commercial records from artists like:
- Drake
- Metro Boomin
- The-Dream
- Bryson Tiller
Their drums feel massive.
That’s usually a combination of:
- Smart sample selection
- Layering
- EQ
- Saturation
- Compression
- Clipping
Layering is the foundation.
Understanding Drum Layers
Think of layered drums like building a sandwich.
Each layer serves a purpose.
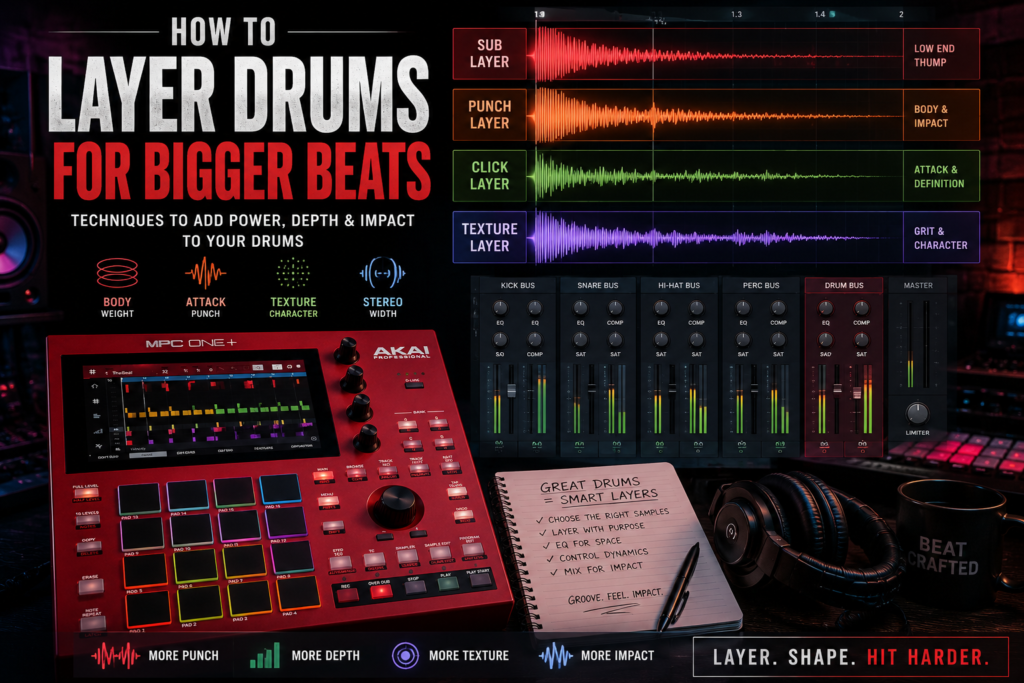
1. Body Layer
This gives weight and fullness.
Examples:
- Low-end kick thump
- Thick snare body
- Warm clap
The body layer gives size.
2. Attack Layer
This provides punch and definition.
Examples:
- Clicky kick transient
- Sharp snare crack
- Bright stick hit
Attack helps drums cut through the mix.
3. Texture Layer
Texture adds character.
Examples:
- Vinyl noise
- Percussive clicks
- Acoustic room sound
- Analog grit
Texture makes drums feel unique.
4. Stereo Layer
Stereo layers create width.
Examples:
- Wide claps
- Stereo percussion
- Ambient tails
- Reverb layers
Not every drum needs width, but it helps create dimension.
Layering Kick Drums
Kick layering is one of the most important skills for beat makers.
A professional kick usually contains multiple elements.
Sub Layer
This handles deep low frequencies.
Usually around:
- 30–80 Hz
This gives chest impact.
Good for:
- Trap
- R&B
- Hip-hop
Punch Layer
This creates the main body.
Usually around:
- 80–200 Hz
This gives weight and knock.
Click Layer
This helps the kick cut through speakers.
Usually around:
- 2–8 kHz
This is especially important for phone speakers and small headphones.
Watch Out for Phase Issues
Phase problems happen when two layers cancel each other out.
Symptoms:
- Weak low end
- Hollow drums
- Loss of punch
If layering makes drums weaker instead of stronger, phase is likely the issue.
Fixes:
- Nudge one sample slightly
- Flip polarity
- Adjust start points
Small timing shifts can make a huge difference.
Layering Snares and Claps
Snare layering is where many modern beats get their signature sound.
A common combination:
Fat Snare + Crisp Clap
Snare provides:
- Body
- Weight
- Punch
Clap provides:
- Brightness
- Width
- Snap
Together, they feel bigger.
This combo is everywhere in modern R&B and trap.
Use EQ to Create Space
Avoid frequency collisions.
Example:
Snare:
- Boost mids
- Reduce highs
Clap:
- Reduce mids
- Keep highs
This separation helps both layers shine.
Control Transients
Too many sharp transients can sound harsh.
Use:
- Transient shapers
- Soft clipping
- Compression
This glues layers together.
Hi-Hats and Percussion
Layering isn’t just for kicks and snares.
Hats and percussion matter too.
Closed Hats
Closed hats create movement.
Try layering:
- Digital hat
- Acoustic shaker
- Noise layer
This creates richer groove.
Open Hats
Open hats help transitions and energy.
Use them to:
- Lead into snares
- Create bounce
- Increase excitement
Percussion
Percussion adds groove and ear candy.
Examples:
- Bongos
- Rimshots
- Shakers
- Tambo
- Foley percussion
Small details often separate good beats from great ones.
Common Drum Layering Mistakes
Using Too Many Layers
More layers doesn’t always mean better drums.
Sometimes 2–3 layers is enough.
Too many layers can cause:
- Mud
- Phase issues
- Confusion
Be intentional.
Ignoring Frequency Masking
If multiple sounds occupy the same frequency range, clarity suffers.
Use EQ to carve space.
Ask:
Which layer handles lows?
Which handles mids?
Which handles highs?
Every layer needs a job.
Over-Compressing
Too much compression kills punch.
Be careful.
Sometimes light saturation works better than heavy compression.
Mixing Layered Drums
Layering is only half the process.
Mixing completes the sound.
EQ
Use EQ to remove unnecessary frequencies.
Examples:
- High-pass claps
- Remove mud from snares
- Control harsh highs
EQ improves separation.
Compression
Compression helps layers move together.
Use it to:
- Glue sounds
- Control peaks
- Improve consistency
Subtle compression often works best.
Saturation
Saturation adds harmonics.
Benefits:
- More warmth
- More perceived loudness
- Better presence
Saturation helps drums feel expensive.
Popular saturation tools include:
- Tape emulations
- Analog consoles
- Soft clippers
Drum Bus Processing
Routing drums to a bus gives better control.
Common bus chain:
- EQ
- Compression
- Saturation
- Soft clipping
- Limiter (optional)
This creates cohesive drums.
In DAWs like Reason, FL Studio, and Ableton Live, drum buses are essential for modern production workflows.
Advanced Layering Tips
Layer by Emotion
Ask:
What should this drum feel like?
Words help.
Do you want:
- Aggressive
- Smooth
- Dark
- Punchy
- Dreamy
- Dirty
Choose layers that support emotion.
Use Contrast
Contrast creates excitement.
Examples:
- Acoustic + digital
- Clean + distorted
- Dry + wet
- Mono + stereo
Opposites often create magic.
Save Your Best Drum Stacks
When you create a great layered drum:
Save it.
Build your own drum library.
Over time, you’ll develop signature sounds.
That becomes part of your producer identity.
Final Thoughts
Learning how to layer drums is one of the fastest ways to level up your beats.
Professional drums rarely come from a single sample.
They’re built.
Layer by layer.
The goal isn’t to make everything louder.
The goal is to make every drum more intentional.
Whether you’re producing on Akai MPC, programming inside Reason, or building trap drums in FL Studio, mastering layering will help your drums hit harder, feel fuller, and sound more professional.
Start simple.
Train your ears.
And remember:
Big drums aren’t about stacking random sounds—they’re about making smart choices.